Drywall Popouts
Most drywall popouts and problems are cosmetic. Many are the result of movement. Others are caused by improper installation.
Typical concerns are drywall popouts from screws or nails, cracking, or ridging in walls and ceilings. These are the kind of things that clients notice and voice concern over.
 With few exceptions, almost all cosmetic issues with drywall are caused by movement:
- Structural – Typically a framing issue due to poor engineering and/or framing techniques.
- Thermal – The expansion and contraction of building materials due to temperature and atmospheric pressure.
- Hygrometric – High levels of moisture in framing lumber and/or drywall.
- Surface Preparation – Improper or lack of shimming prior to installing drywall.
- Seam Placement – Incorrect placement of drywall seams and/or large gaps at seams.
To some extent, all of these are under the builder’s control – not necessarily the remodeler’s control. What is the difference? The builder is the person who originally built the house or structure. The remodeler is the person who makes changes to an existing house or structure. With remodeling, the structure is already in place. All the walls, ceilings and floors are already built before the remodeler starts anything. The remodeler has no idea what is behind the walls, ceilings, and floors. He will not know until he removes all coverings and has an opportunity to look things over.
Structural
 Some production builders are so focused on cost that they reduce the structural wood panel sheathing (shear panels) on their buildings to the bare minimum required by code. The result is a structure that is less stiff than if they fully sheathed the entire exterior of the building. A partially sheathed building may not fall down, but it does flex more than a fully sheathed building under wind loads. These loads can cause drywall to crack. Fully sheathed buildings are stiffer, and they have fewer drywall problems.
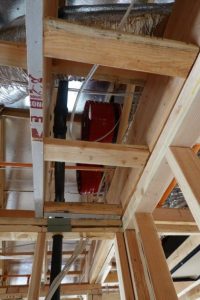
For most homes in Orange County built prior to 2000, they do not have shear walls. These homes typically have 2×4 framing with stucco, wood, or a combination of the two on the outside. It was not until after the Northridge earthquake on January 17, 1994 that residential shear wall construction became common.
 Concrete foundations have a tremendous impact on drywall popouts and cracking. Prior to 1990, most residential concrete foundations or slabs were completed in two steps. Step one was pouring a concrete footing (stem wall). Step two was pouring the slab in the middle. The problem with this system is it generated a lot of movement as the two separate pours moved independently and randomly. This causes cracking in drywall throughout the home.
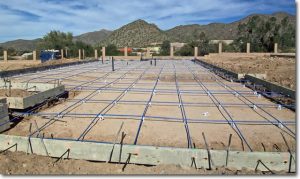
To remedy this problem, builders started using a Monolithic pour. Here, the entire slab system is constructed as one single concrete pour. The stem wall and slab are poured at the same time as one giant piece of concrete. This was a game changer and virtually eliminated structural drywall cracking throughout the house.
Unfortunately for Orange County, a significant number of homes were built using the old two step method. For these homes, there will always be drywall cracking.
 |  |
Post tension slabs
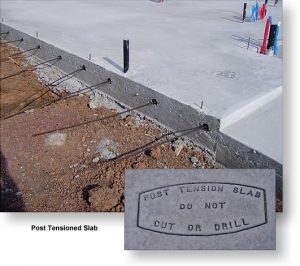
The other structural issue is post tension slabs. This too, was not common until around 1990. Orange County has very unstable soil (sand, clay, and sandstone). This creates a lot of movement between wet and dry seasons as these soil types expand and contract. This constant movement breaks up concrete slabs and creates cracks in drywall as the house shifts. The solution for this problem was a Monolithic pour with post tension cables. These cables have tension applied to them after the slab is poured. These cables squeeze the slab together. Put your two hands together with a piece of bread between them. Now squeeze or push your hands together. The bread is compacted very tight. That is what post tension cables do.
Thermal
All the elements discussed within the Structural section are also thermal related. In other words, soil, concrete, lumber, drywall, stucco, roofing, tile, etc. all expand and contract differently. Temperature, humidity, atmospheric pressure, rain, wind, etc. all impact building material movement. For example, if tile is installed directly over a concrete slab without first installing a crack isolation/moisture barrier, the tile will typically crack, and the grout will come loose. If there is a lot of direct sun on a portion of a house, the inside drywall likely will experience a lot of movement, especially if there are no shear panels or proper insulation in the wall cavity. The lumber in the walls moves differently than the drywall at the same temperature. Eventually, this will cause the drywall joints to buckle or crack.
Hygrometric
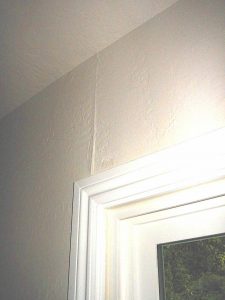
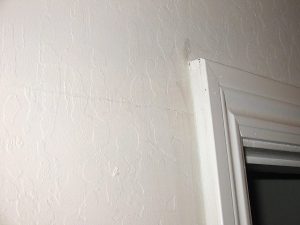
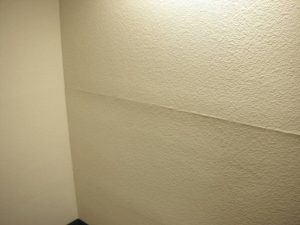 The image to the right illustrates ridging of a horizontal joint at mid-wall height. This is likely caused by lumber shrinkage due to using wet lumber (this can also be the result of butting a ripped drywall edge to a tapered edge – called ridging). Both of these conditions are preventable. How? Wait until lumber has dried sufficiently before installing the drywall. Never butt a tapered edge to a non-tapered edge.
The reason these types of mistakes are made is twofold: (1) Trying to get the job done fast. Using wet lumber for framing is typical. It makes framing easier and allows full penetration of nails without excessive splitting and splintering of the lumber. However, after the framing is completed, the framing must be allowed to drywall before installing drywall. (2) Drywallers trying to conserve materials to cut costs. The best drywall jobs have a fair amount of waste. Using all the pieces to minimize waste rather than a fresh piece will cause problems (like ridging).
Surface Preparation has a lot to do with Drywall Popouts
 It is all about shimming. Framing lumber is not perfect. It has bows, racks, ridges, and twists. It comes from a tree and trees are far from perfect. Sure, you can cut a straight 2×4 out of a tree. However, how that tree grew over the years and the nutrients it received various greatly. Nature is not perfect. As wood dries, its shape naturally changes.
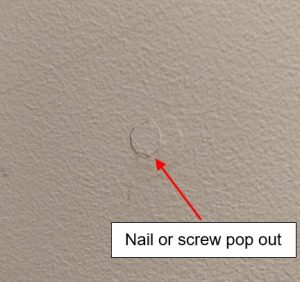
Shimming involves using strips of material to make plumb (level) the surface of the lumber. If drywall is installed over a piece of lumber with a concave curve, the screw used to attach the drywall to the lumber will pop out. This is commonly referred to as drywall popouts or nail pop outs (Nails were commonly used to install drywall prior to the advent of drywall screws). Failure to shim lumber imperfections causes lots of drywall popouts, ridging, and cracks.
Many drywall installers do not take the time to perform shimming. Why? It takes more time and materials. In other words, it costs more money.
Adhesives – Many drywall installers use adhesives thinking it makes drywall adhere better to the lumber imperfections. It does not work. Low VOC adhesives will cause significant pop outs. Why? When the adhesive dries, it sticks to the lumber and the drywall paper backing. However, it does not stick to the gypsum itself – it cannot because of the paper backing. Therefore, as the gypsum expands and contracts differently than the lumber, it separates from the paper causing drywall popouts.
Seam Placement and Drywall Popouts
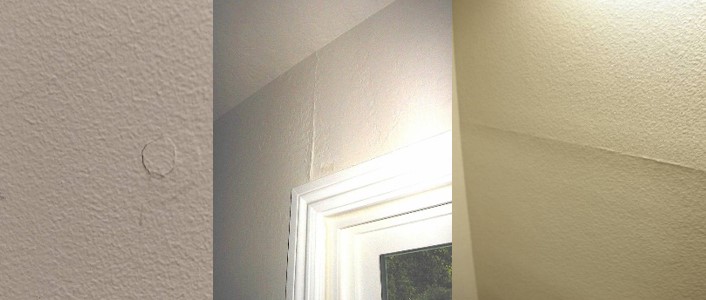
If there was only one area where a small change would make a huge difference, it is seam placement. When installing drywall over a door, window, or any opening, the drywall must be placed 12” from the edge of the opening or center of the opening. If possible, no seam over an opening is ideal (this is not always possible). I am certain many of you have the exact scenario as illustrated below. As with all things in life, you get what you pay for. The pictures below clearly illustrate low budget work.
 | |
Always Hire a Reliable and Dependable Contractor to Remodel your Home
 Always work with a trustworthy contractor like DAD’s Construction. We are experts in bathroom, kitchen, and interior remodeling. We remodel and manage projects in an efficient manner. DAD’s Construction will do everything to minimize the possibility of change orders. Our team will make sure we have all the necessary information to prepare a proposal that meets your requirements. Rest assured that we will provide you with a detailed, by line-item contract. We will make sure that the contents of this agreement are properly and clearly communicated to you. If you have questions or need updates regarding your project, we will always answer your inquiries.
How Can I Receive More Information on Drywall Popouts?
If you would like more information on enjoying the best bathroom, kitchen, and interior remodeling experience in Orange County, call Dan at (949) 380-0177 or at dan@dadsconstruction.com for a free in home consultation. DAD’s serves all of South Orange County California. This includes Lake Forest, Mission Viejo, Foothill Ranch, Portola Hills, Ladera Ranch, Irvine, San Clemente, Dana Point, San Juan Capistrano, Rancho Santa Margarita, Coto de Caza, Dove Canyon, Laguna Niguel, Laguna Hills, Laguna Beach, Newport Beach, and Aliso Viejo.