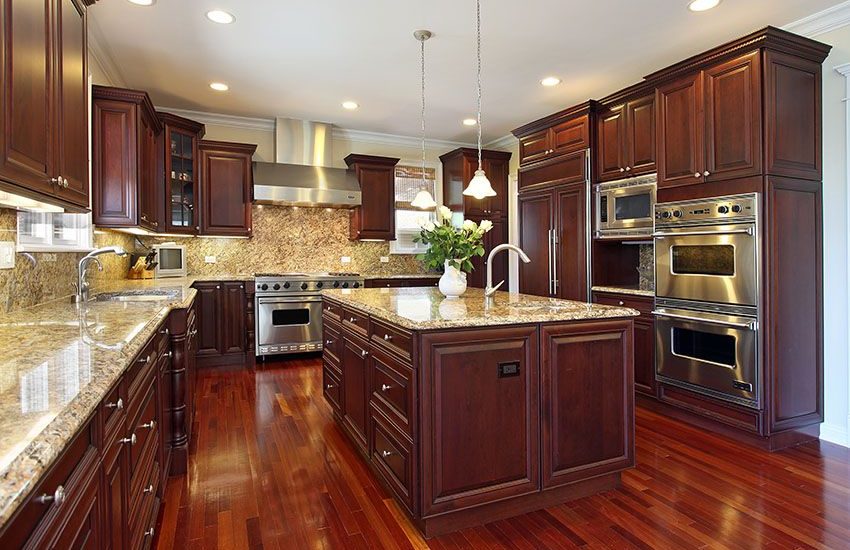
Kitchen Island
Almost everyone who performs a kitchen remodel in Mission Viejo, Irvine, Lake Forest, Rancho Santa Margarita, and other South Orange County California communities want a kitchen island! Over the last 10 years and increasingly over the last several years, an island has reached the level of being a requirement for clients. Here’s what you need to know.
One of the most requested items in kitchens is a large island. Now, 60% of all kitchen remodels include adding an island. And not just some square set of cabinets to place groceries on. Clients increasingly want the island to be a focal point. Bigger, more functional islands that can perform a host of duties are highly desired. Workspace, eating space, storage space, appliances – clients want these minimum features.
Before anyone promises you everything you ever wanted in a kitchen island, take a look at your kitchen space and consider the following:
 The current size of your kitchen. Most kitchens are in a “U” shape. Considering this typical layout, the width of your kitchen will need to be at least 181” (15 feet, 1 inch) wall to wall for an island. Consider further:
- The sink side requires 26” for the base cabinets (24” for cabinets plus 2” for the countertop edge).
- The refrigerator/pantry side requires 36” for the base cabinets (accounts for the standard fridge depth and its handles).
- Space on both sides of the island: 42” minimum to allow 1 cook to move. If there will be more than 1 cook, you’ll need 48”. Think about the refrigerator, oven, and dishwasher doors being open. Even with 42”, with the dishwasher open (24” standard dishwasher door), this only gives you 18” in front of the dishwasher door when open. Look at 18” on a tape measure. At the feet and knees, most people walk using a width (left to right side of the body) of about 15” – 18”. So, the 18” clearance is barely sufficient. A 48” width is much better. The minimum width for a functional island is 35” (32” for the base cabinet and 35” with the countertop edges).
How can I get an island if I don’t have the space? There are a few ways to include an island if the current kitchen space does not work:
- Increase the size of your kitchen by adding on to the outside of the house (addition).
- Increase the size of your kitchen by moving, removing, or altering the inside walls surrounding your existing kitchen.


- Change the current configuration or layout of your kitchen.
- Add a peninsula to your kitchen instead of an island. What’s a peninsula? Think of an upside-down letter “Γ”. A peninsula is the vertical part of the “Γ” with the cabinets being the horizontal part. The horizontal part is connected to the wall while the peninsula extends out into the kitchen area. It’s not a truly separate set of cabinets – hence, it’s not an “island”.
Do I need any electrical in my kitchen island?
By Code, every island must have at least 1 electrical outlet (receptacle). Bigger islands must have 2. Why? Because kitchen appliance cords are about 2 feet long. Also, you absolutely do not want to use an extension cord from the main cabinets, across the walkway, over to the island. That would be a very dangerous and potentially deadly situation. Moreover, a standard household extension cord will overheat and can catch fire when using an electric skillet, coffee maker, waffle maker, popcorn maker, etc. Remember, kitchen outlets are 20amps of power!

 To get power to the island, a section of the floor must be removed beginning at the outside wall area and continuing to the island location. If the floor is concrete, this will need to be removed down to the dirt. Then, special electrical conduit is buried beneath the dirt. The 20amp electrical wire is then installed through the conduit up into the island. Now the concrete is replaced.
- Your concrete floor might be post tension. The location of these structural cables will need to be located first using x-ray or sonar before removing any concrete. Should one of these cables are broken, it can easily cost up to $3,000 to fix. If it’s not fixed, your house structure will be severely compromised. Don’t let anyone install or relocate an island unless they have lots of experience and knowledge doing this. DAD’s knows how to do this and has never broken a post tension cable. Many companies won’t perform this extra step to identify the cables and simply damage or sever the cables and never tell you. Why would they do this? It’s much faster and less expensive to cut through the cables and move on. Never mind the fact that your house now has serious damage.


What if I want or need plumbing in my kitchen island?
Plumbing (Sink, dishwasher): Just like the electrical, the concrete or wood flooring needs to be removed to install the hot and cold water, sewer line, and the vent. Adding a sink to an island requires more space inside the island and additional plumbing work (see the corresponding picture).
If a client adds a dishwasher, the amount of plumbing work is roughly doubled. Moreover, the dishwasher electrical must be on its own dedicated circuit. This is separate from the appliance outlet(s). If the client adds a microwave into the island, this too must be on its own dedicated 20amp circuit.
I would like a cooktop in my kitchen island.
- Placing a cooktop into an island requires additional electrical. This electrical must be a dedicated circuit. If the cooktop is gas, this too will need to be added. All of this typically from underground to the island.
- A cooktop also requires ventilation. This can get tricky. A cooktop must ventilate outside. Unlike a microwave (which can vent inside the house – not optimal, but permissible), the cooktop must vent outside whether it’s gas or electric. The venting moves both the heat and harmful gases outside.
- There are options in doing this. The most common is to install the venting underground to the outside. Many folks don’t realize this and pour their patio concrete completely over the vent, causing nasty problems. I’ve also seen where they build a box around it before installing the concrete patio . . . only to have it fill with water when it rains. Another option is to install a chase up to the ceiling and then traverse across the ceiling, venting out the side wall. If it’s a single-story home, it can vent out the roof. Less common is installing a range hood over the island and venting it through the roof or out the side of the house.
- If your’re performing a remodel and there was never a cooktop in the island from the start, adding this feature will be expensive.
 What about seating?
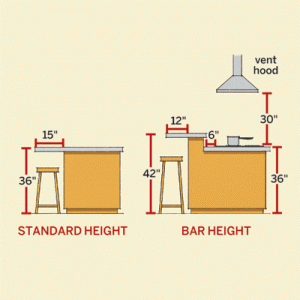
This is a clearance issue. Seating should be 24 inches wide. In other words, allow 24” for each chair or stool. However, the depth, or knee space, required varies with countertop height. For a 30-inch-high island, knee depth should be 18 inches; for a 36-inch height, it should be 15 inches; and it should be 12 inches for a 42-inch-high island. If you’re using just a basic stool with no back, 10” between the stool and countertop when installing a 36” high counter can work (it’s not necessarily comfortable and it’s limiting, but it’s possible if necessary).
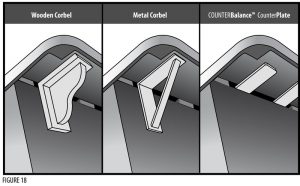
The island overhang is important when considering seating. Typically, a bar height overhang is 12” while the standard overhang for a single level island is 15”. Anything 12” and over requires a corbel. What’s a corbel? Think of it as an “L” bracket under the countertop to keep the countertop from sagging and cracking. Once you get to 12”, you must use a corbel, or the countertop will crack. Depending on the material you use on the countertop, it may be appropriate to use a corbel for anything 10” and over. Below is a rendering of a few examples of corbels.
 It’s really important to get the overhang measurement correct for what you’re doing. If it’s wrong, you and your guests will be uncomfortable.
Here’s a chart to help with island overhangs:
Island Height | Overhang |
42 inches | 12 inches |
36 inches | 15 inches |
30 inches | 18 inches |
Always Hire a Reliable and Dependable Contractor to Remodel your Kitchen
 Always work with a trustworthy contractor like DAD’s Construction. We are experts in bathroom, kitchen, and full interior remodeling. We remodel and manage projects in an efficient manner. DAD’s Construction will do everything to minimize the possibility of change orders. Our team will make sure we have all the necessary information to prepare a proposal that meets your requirements. Rest assured that we will provide you with a detailed, by line-item contract. We will make sure that the contents of this agreement are properly and clearly communicated to you. If you have questions or need updates regarding your project, we will always answer your inquiries.
How Can I Receive More Information on Kitchen Islands?
If you would like more information on enjoying the best bathroom, kitchen, and interior remodeling experience in Orange County, call Dan at (949) 380-0177 or at dan@dadsconstruction.com for a free in home consultation. DAD’s serves all of South Orange County California. This includes Lake Forest, Mission Viejo, Foothill Ranch, Portola Hills, Ladera Ranch, Irvine, San Clemente, Dana Point, San Juan Capistrano, Rancho Santa Margarita, Coto de Caza, Dove Canyon, Laguna Niguel, Laguna Hills, Laguna Beach, Newport Beach, and Aliso Viejo.