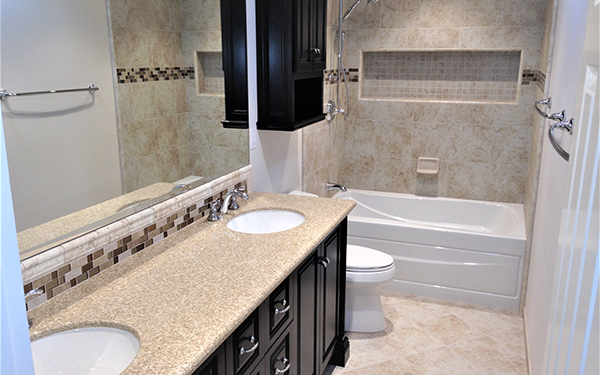
Remodeling a Bathtub
Remodeling a bathtub has 3 major parts. These are:
- Demolition.
- Selecting and installing a new bathtub.
- Installing tile around the bathtub.
This article will focus on the third item, Installing tile around the bathtub. For demolition, see the article How Much to Replace a Tub. For tub selection and installing, see What Is The Best Kind of Bathtub to Get, Bath Remodel, and Is Porcelain or Ceramic Tile Better for Bathtubs.
Information on where to place the fixtures can be learned by reading the article on bathtub fixtures.
There are basically 5 methods when remodeling a bathtub using tile as a surround.
- Green board drywall
- Cement board
- Polystyrene foam panels
- Polyethylene sheets
- Lath and mortar
A bathtub is fundamentally a mini swimming pool. All tile and grout absorb moisture. In other words, regardless of tile or grout quality or sealers used, all tile and grout will take in some moister. This moister can, over time, penetrate beyond the tile and grout. Using the right methods behind the tile and this is not a concern. The most important part of any tile project is the preparation and application of the tile’s substrate. The substrate is what’s behind the tile keeping it strong, durable, and water resistant. As with anything, the foundation is always the key to safety, quality, strength, and durability.
Green Board Drywall
Green Board Drywall | |
|
|
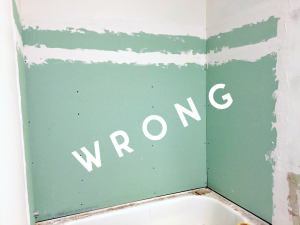
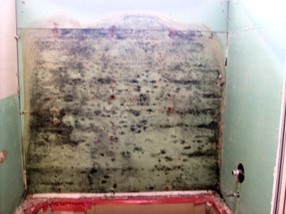
This is perhaps the worse method of all when remodeling a bathtub. Drywall (sheetrock) falls apart when wet. Installing a product like this around a bathtub is a bad idea. Several decades back, this was a fairly common and acceptable practice. Originally used for bathtub, shower, and steam room applications. Why? Because its moisture and mold-resistant properties made it an ideal and super inexpensive product. However, as time passed, it became apparent that it was a really bad idea.
These systems failed as they became wet and damaged homes due to moisture, mold, and rot. This type of application is illegal and not to code. It really is a terrible idea and can cause destructive damage to your home and be extremely harmful to your health and safety. It’s the least expensive way to tile a bathtub, but also the worst. There is never any warranty with this system – it will fail fast!
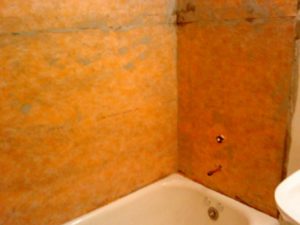
Cement Boards
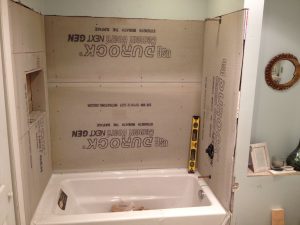 Cement boards are a combination of cement and reinforcing fibers. This product is formed into 3 by 5 foot sheets that are 1/4 to 1/2 inch-thick. Cement boards are nailed or screwed to wood or steel studs to create a substrate for vertical tile surfaces. The most common are HardiBacker®, Durock®, and WonderBoard®. Although preferred by many tile installers and contractors for their ease and speed of installation and lower cost, they will leak – I’ve seen it myself. The problem? Look at the picture. What do you see? You see lots of seams, nail, and screw penetrations. After installation, you can’t see that the walls are not plumb and square as these panels are installed directly over the wall studs. When the tile and glass enclosure are installed, this becomes visible as the finished product has an “off” and unpolished appearance.
Cement backer boards have a limited life time warranty. The problem? This limited warranty does not cover water intrusion damage to the underlying structure to which the product is applied (in other words, your house!). What this means is that the warranty is only valid until water gets through to the cement board – which it will! Many local building codes will not allow this product.
Kerdi-Board Polystyrene Foam Panels
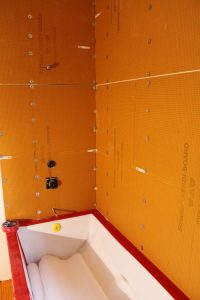
 Schluter®-KERDI-BOARD panels come in eight different thicknesses. It is a multifunctional tile substrate and building panel. Extruded polystyrene foam panels are designed to replace solid backing panels (i.e., gypsum board, cement backer board). Can you imagine the weakness and reliability of 1/2-inch foam panel walls behind your tile?
Using thin-set mortar, tile can be applied directly over these foam panels (they contain no cement). Prior to installing the tile, all the panel seams, corners, and screw attachments are covered using 5-inch wide by 5mm (about 3/16 inch) thick strips of Polyethylene using thin-set mortar.
Certain glass and stone tiles are not compatible with this system. It comes with a non-transferable, very limited 10-year warranty. What does this mean? It means there is a strong likelihood you will experience a problem within 10 years.
Kerdi Polyethylene Sheets
 Polyethylene is a waterproofing layer that protects moisture-sensitive substrates. Unmodified thin-set mortar or other suitable trowel-applied waterproofing materials cover the seams. Common names are Schluter®-Kerdi Waterproofing Membrane and Schluter® Systems Kerdi. Kerdi is available in rolls and is applied directly over drywall or cement board.
 Using thin-set mortar, tile can be applied directly over polyethylene. Prior to installing the tile, all the seams receive a coating of thin-set mortar. Tub valve openings are covered using prefabricated polyethylene seals. These too are applied using thin-set mortar.
This system is becoming increasingly popular with tile installers and contractors. Why? Like its cement board and polystyrene foam panel cousins, its fast and easy to install. This lowers the cost to install – a great selling point. What’s the reality? Anything with a seam can fail. Have you ever seen a swimming pool with a seam?
Lath and Mortar when Remodeling a Bathtub
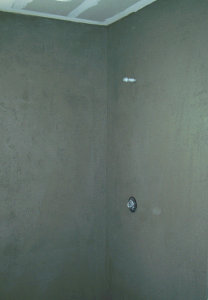

This is the best system by a wide margin when remodeling a bathtub. This process uses a water-resistant tile underlayment consisting of a vapor retarder, galvanized steel lath, and a Portland cement/premium plastering sand mixture. Lath and mortar is an extremely effective moisture vapor retarder. It is very strong, durable, and allows for plumb, square, and level walls.
This system creates the required “swimming pool” to keep water from escaping into your homes walls, floor, and ceiling structures. Unlike the other systems, I have never seen a properly installed mortar system leak, crack, or deteriorate over time. I’ve removed countless mortar systems that were 50 plus years old and they always looked great. They had no water vapor damage or cracks in the tile. It works – and it passes the test of time. It comes with a lifetime warranty. This system exceeds all local building codes.
Always Hire a Reliable and Dependable Contractor to Remodel your Bathroom
 Always work with a trustworthy contractor like DAD’s Construction. We are experts in bathroom remodeling who can manage projects in an efficient manner. DAD’s Construction will do everything to minimize the possibility of change orders. Our team will make sure we have all the necessary information to prepare a proposal that meets your requirements. Rest assured that we will provide you with a detailed, by line-item contract. We will make sure that the contents of this agreement are properly and clearly communicated to you. If you have questions or need updates regarding your project, we will always answer your inquiries.
How Can I Receive More Information on Remodeling my Bathroom?
If you would like more information on enjoying the best bathroom, kitchen, and interior remodeling experience in Orange County, call Dan at (949) 380-0177 or at dan@dadsconstruction.com for a free in home consultation. DAD’s serves all of South Orange County California. This includes Lake Forest, Mission Viejo, Foothill Ranch, Portola Hills, Ladera Ranch, Irvine, San Clemente, Dana Point, San Juan Capistrano, Rancho Santa Margarita, Coto de Caza, Dove Canyon, Laguna Niguel, Laguna Hills, Laguna Beach, Newport Beach, and Aliso Viejo.